Machine learning for everyone, regardless of technical background
Almost every day, we hear we can use the superpowers of AI to make our work easier, automate routine tasks, speed up our workflows, increase accuracy and make more money. In the drone industry —especially in the geospatial sector— we hear a lot about how AI will help us extract actionable information from unstructured image data at a scale and speed never previously seen.
We are quite familiar with the potential of AI, but what if you are not a machine learning expert?
The good news is you don’t need to be a machine learning expert —and you don’t need to hire one— to harness the power of AI. Picterra has created an online platform —with an easy-to-use graphic user interface— to make AI-powered object detection accessible to everyone.
The signature tool of the platform is the custom detector, which allows you to train your own AI detection model in just a few steps, without writing a single line of code.
Get your customer detector working in a few easy steps
AI models can be good students, but they are not human. They lack your intuition and they see things differently. You need to teach them to see the world through your eyes.
To train an AI model to detect objects in an image you need to tell the algorithm WHERE it should learn relevant information and show it examples of WHAT it should —and shouldn’t— learn to find.
The first step is to understand how you “see” objects. Think about it. How do you define what the object you are looking for looks like? How do you identify a single unit of this type of object? What are the visual features for which you are looking? Is it the shape? The color? The size? The texture? A concrete part of the object? The combination of all of them under certain circumstances?
Once you have identified the key visual features that define your object of interest, you can teach the AI model to find it.
For demonstration purposes, we will walk through a challenging sheep detection project, using the custom detector tool on the Picterra platform.
Step 1: Determine where the best training areas are
This is the image before adding any training information:

On the left is what you can see; on the right is what the AI model can see before you tell it where to look. Exactly, it sees NOTHING!
You need to tell the AI model to open its eyes and provide it with information it can “see” to learn from.
Analyze your image and find spots where you have examples of your object of interest and spots where you don’t have them. These spots are called “training areas”. The algorithm will look at them to learn.
Select some of them to tell the algorithm WHERE it should look for examples of both what you are interested in and what you are not interested in. Keep in mind that the AI model won’t learn from the other sections of your image that you didn’t highlight.
Where you have examples: highlight them
These are sections of your image that you highlight to tell the algorithm, “look at this region, here are the examples of what I need you to find”.
Each training area should contain multiple examples of your object of interest. It is important to draw a series of training areas that highlight your objects of interest in different contexts.
You want to identify sections of your image where your objects of interest appear on different backgrounds, in different distribution configurations, or in different lighting conditions:

Here the human intelligence in charge is telling the AI model to have a look at these sections of the image. At this stage, only the human knows what is in the selected spots —sheep on a background in full shadow, sheep on the grass, and sheep on the bare ground.
Where you don’t have examples: define counterexample areas
Defining areas where you know there are not examples of your object of interest helps the algorithm by enabling it to understand what you are NOT looking for looks like.
The AI model will use these sections of your image as counterexamples. It is particularly helpful to draw the attention of the algorithm to areas where you have objects that look similar to your object of interest, but which are not that for which you are looking. It usually also helps if you include spots that are pure background.
![]()
Here we are telling the AI model to have a look at these sections of the image. It doesn’t know it yet, but we will use these spots to teach it that bushes, grass, and dogs are not sheep.
The algorithm will learn what sheep look like by having a look at both the training containing examples and the empty training areas containing counterexamples.
Once we have defined the training areas, the AI model knows where to look for information.
On the left is what you can see; on the right is what the AI model can see once you have added training areas.
Step 2: Determine how to best draw your annotations
You have already told the algorithm WHERE are the regions on which it should keep its “eyes” focused. Now it is time to tell it WHAT it should look for.
You should start by identifying the visual features that define the object you are interested in.
In order to do so, you need to think about what helps you recognize an object as such.
The next step is outlining —in other words annotating— these objects. This is the way you communicate to the algorithm WHAT you need it to learn to find.
Learning how to draw your annotations is an intuitive and experimental process.
How do you define a “unit” of this type of object? What is the key visual factor you “see”? Is it the full object? Or is a specific and distinctive part of it?
In this case, we started with full-body outlines:
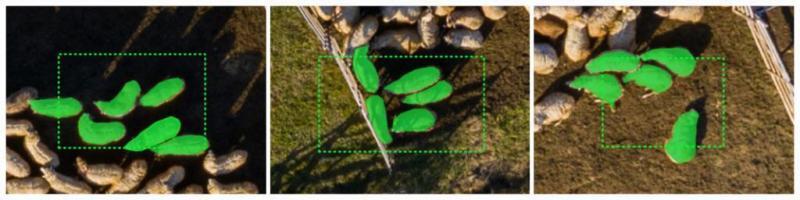
We drew polygons to outline the sheep.
Make sure you annotate all the relevant objects contained in your training area and the ones crossing its boundary. Keep in mind that anything contained in a training area that is not highlighted as an example will be considered a counterexample.
That’s everything the model needs to start doing its homework. Now you can click “Build & Test Detector” to train the model and get it to detect objects on the rest of your image.
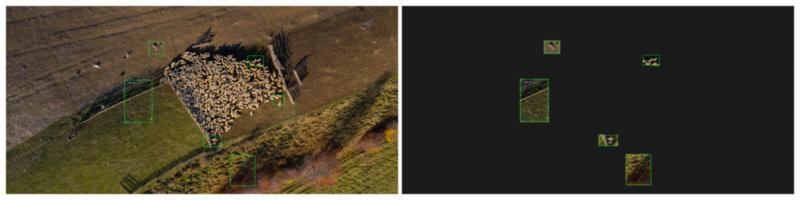
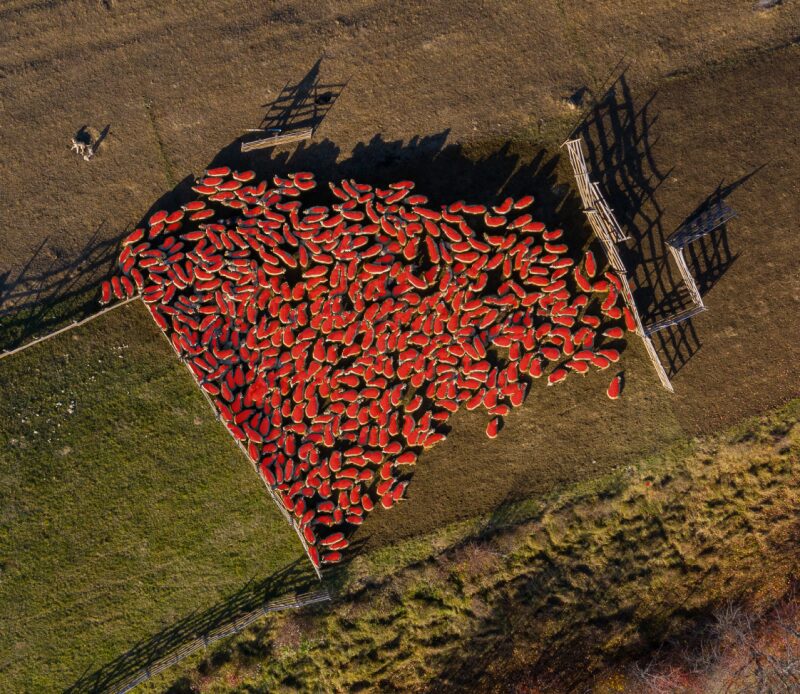
Now, let’s check what the algorithm learned. For reference, in this image, the known sheep count is 433:
Can we annotate these sheep differently?
In this image, the sheep are standing very close to each other, making it a very challenging project to count them individually. We’ve optimized Picterra AI to better separate these objects but if you look closely there are still a few pairs or triplets of sheep that are merged into a single detection. The way you annotate an object has an influence on the output, so we decided to explore a few variations in the method of drawing the annotations to check how it affected the outputs.
Let’s compare how annotating the objects differently produces different outputs by using only circles to annotate the heads of the sheep.
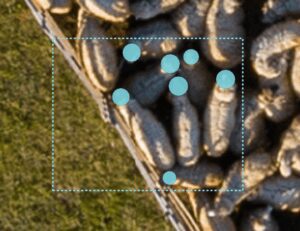
The output has fewer merged detections, with an overall headcount of 416, pretty darn good:
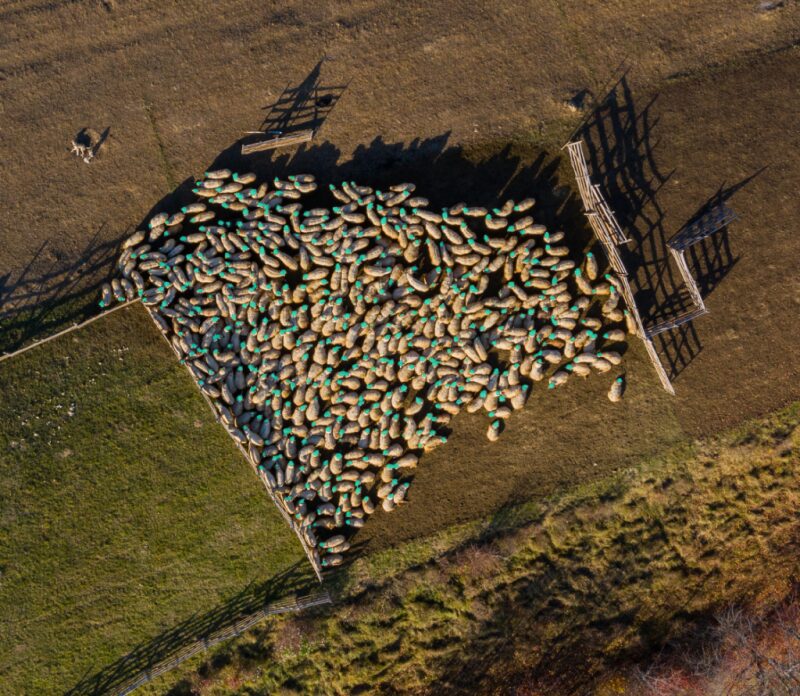
The model detected 96% of the sheep as individual objects.
How to get it wrong?
Keep in mind training and customizing an AI detection model is an intuitive and iterative process: you will need to explore and test what works best for each type of object you want to detect.
Keep in mind these biggest pitfalls:
- Not defining training areas. Even if you annotated objects, without training areas this is what the model will see – NOTHING:

- Defining large training areas containing a few small annotations. When you define training areas that contain examples, as a rule of thumb 20 to 40% of the space inside the training area should be covered by annotations. If you want to add a counter-example area, add a separate one:
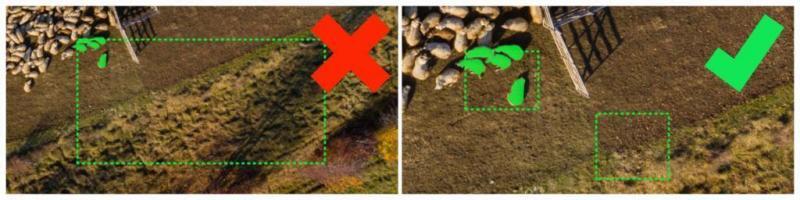
- Defining very small training areas. Your training area should contain your objects of interest and a fair amount of background. This will help the model understand how the context area in which it would find your object of interest looks. Try to balance the size of the area of annotated and non-annotated elements:
- Wrapping a training area around a single object:
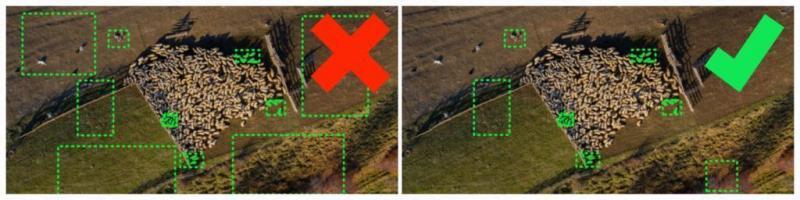
- Defining too many areas containing examples and very few containing counterexamples or vice versa. Again, it’s all about balance and making sure you included a variety of both, examples and counterexamples:
- Annotations containing very few pixels are likely to give bad results. For this point take into consideration our recommendations regarding the link the size of the object and the image resolution. Imagine you were trying to detect our woolly friends in an image with lower resolution. It wouldn’t have worked, because the amount of information you would be giving to the AI model wouldn’t have been sufficient for it to understand how the pixels you selected are different from other sections of the image:
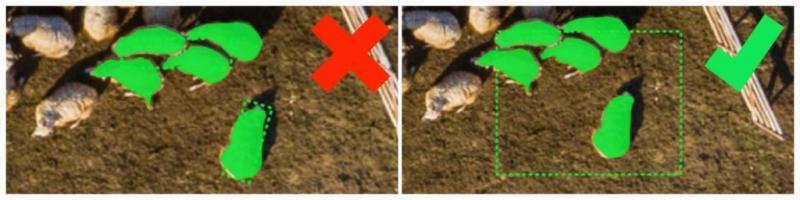
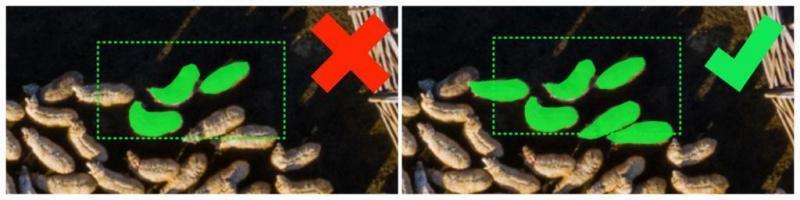
- Not annotating all of the examples contained in your training area:
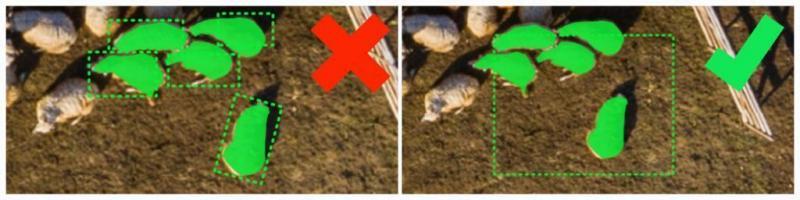
- Not annotating examples that are not fully contained in a training area. You want them to be considered – if you don’t annotate them they will be considered counterexamples:
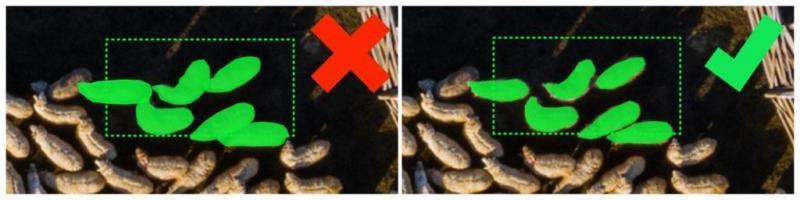
- Overlapping annotations when the end goal is counting individual objects:


Build your own AI detector
Discover what type of annotations work best for the type of object you need to track and for the context they are in.
You might be trying to detect a type of object that has a totally different shape, pattern, and color. These objects might appear distributed throughout your image or might be grouped in a different pattern.
As you learn how to use Picterra you will likely experiment with different ways of annotating your objects of interest and over time you will gain a better intuition of what types of annotation suit different types of objects best. Just as you are the teacher of your own AI, the teacher too needs to learn how to become an effective instructor! In addition to playing around with your annotations, there are some settings on your detector that you can adjust as well (for example, the shape and size of the output). Also, check out our medium blog posts for more info!